KEYFRAME INTERPOLATION

<< straightens up the curved path
/ select a key frame>animation>keyframe interpolation
/ same result as above, different method
/ right clicking on the keyframe
/ select all keyframe>toggle hold keyframe
this means that there are no inbetween sections (the image will jump to positions rather then move smoothly)

^^ applying the 'hold keyframe' to the word blink in order to create that quick action of blinking
In order to make the movement between key frames even go to > rove across time & this equals the time & movement of the action.
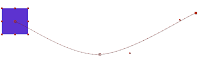
USING ILLUSTRATOR PATHS


^^ simple copy n paste into after effects (after selecting position & activated key frame)
/ the shape then moves around the illustrator shape
/ if necessary go animation>keyframe assistance>time-reverse keyframe in order to reverse the direction of movement
/ layer>transform>auto-orient in order to make the circle orbit the shape
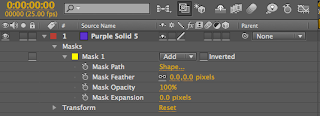
<< mask layer (either by selecting the shape tool (& layer) or selecting the pen tool
when importing type from illustrator whilst the layer is selected the type appears as separate masks
/ pressing 'm' whilst all masks are selected allows you to see your mask properties
/ whilst all layers are selected you can then create keyframes and edit the animation:


/ by selecting 'toggle switches/modes' more options become available
/ alpha & luma refer to the lighter/darker layors
/ working with a larger image then the frame allows you to create movement (using position)


<< straightens up the curved path
/ select a key frame>animation>keyframe interpolation
/ same result as above, different method
/ right clicking on the keyframe
/ select all keyframe>toggle hold keyframe
this means that there are no inbetween sections (the image will jump to positions rather then move smoothly)

^^ applying the 'hold keyframe' to the word blink in order to create that quick action of blinking
In order to make the movement between key frames even go to > rove across time & this equals the time & movement of the action.
USING ILLUSTRATOR PATHS


^^ simple copy n paste into after effects (after selecting position & activated key frame)
/ the shape then moves around the illustrator shape
/ if necessary go animation>keyframe assistance>time-reverse keyframe in order to reverse the direction of movement
/ layer>transform>auto-orient in order to make the circle orbit the shape

<< mask layer (either by selecting the shape tool (& layer) or selecting the pen tool
when importing type from illustrator whilst the layer is selected the type appears as separate masks
/ pressing 'm' whilst all masks are selected allows you to see your mask properties
/ whilst all layers are selected you can then create keyframes and edit the animation:


/ by selecting 'toggle switches/modes' more options become available
/ alpha & luma refer to the lighter/darker layors
/ working with a larger image then the frame allows you to create movement (using position)